NOTE: The images in this guide will be showing the installation steps for the NC Shop Floor Programmer role, however the same steps can be taken for any other locally installed 3DEXPERIENCE Native application, with the correct respective app, which is outlined in the Appendix of this guide.
Step 1: Verify Your Assigned Roles
-
Log in to the 3DEXPERIENCE platform.
-
Ensure that the necessary roles for the application you wish to install are assigned to your account.
TIP: Need help assigning your roles? Check out this guide on how to assign and manage your 3DEXPERIENCE roles.
Step 2: Access the Application List
-
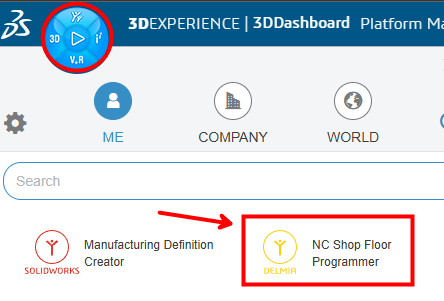
Open the Compass, which is the blue circle with a play button in the top left corner of your screen.
-
Under the My Roles section, locate and click the role associated with the application you want to install.
-
This will display a filtered list of all applications included in that role package.
-
Step 3: Select the Application to Install
-
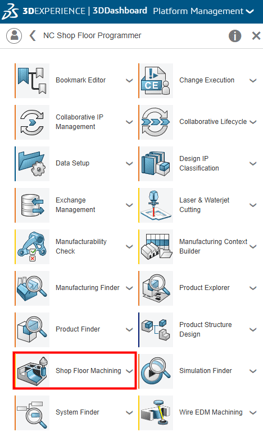
Identify the application you wish to install.
-
See the Appendix at the end of this guide for direction on which app to look for depending on what role you have assigned to your account.
- e.g., If you have NC Shop Floor Programmer assigned, you will click on the Shop Floor Machining app.
-
-
Click the application to begin the installation process.
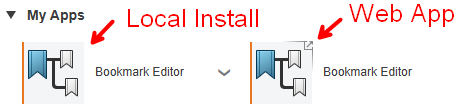
TIP: Native applications that require local installation do not have a small gray arrow in the top-right corner of their icon.
Step 4: Install the 3DEXPERIENCE Launcher (if required)
-
If this is your first time installing a local 3DEXPERIENCE application, you will be prompted to install the 3DEXPERIENCE Launcher.
-
Follow the prompts to install the launcher.
-
After installation of the launcher is complete, click the application again to start the installation of the application.
Note: If you encounter an issue where your 3DEXPERIENCE Launcher repeatedly asks you to install, please see this article for quick steps to resolve this behavior.
Step 5: Complete the Application Installation
-
Follow the steps in the Installation Wizard to complete the setup.
-
Once the installation is finished, click the application icon in your web browser to launch the application.
Optional: Create a Desktop Shortcut
-
To create a desktop shortcut, click the down arrow next to the application icon in the web browser.
-
Select Create Desktop Shortcut.

Appendix
Utilize the following tables to quickly narrow the correct app to launch to trigger the installation based on which role(s) you have assigned.
For example, if you have the Structural Designer role assigned to your account, you will click on the Linear Structural Validation app to start the installation.
Simulation Roles |
|
|
Role |
App |
|
Structural Designer |
Linear Structural Validation |
|
Structural Engineer |
Linear Structural Scenario Creation |
|
Structural Performance Engineer |
Structural Scenario Creation |
|
Structural Mechanics Engineer |
Mechanical Scenario Creation |
|
Durability Performance Engineer |
Structural Scenario Creation |
|
Durability and Mechanics Engineer |
Mechanical Scenario Creation |
|
Fluid Dynamics Engineer |
Fluid Scenario Creation |
|
Electromagnetics Engineer |
CST Studio Suite Connected |
|
Plastic Injection Engineer |
Plastic Injection |
Manufacturing Roles |
|
|
Role |
App |
|
NC Shop Floor Programmer |
Shop Floor Machining |
|
NC Prismatic Machine Programmer |
Prismatic Machining |
|
NC Prismatic & Mill-Turn Machine Programmer |
Prismatic Machining |
|
NC Mold and Die Programmer |
Prismatic Machining |
|
NC Milling Machine Programmer |
Prismatic Machining |
|
NC Mill-Turn Machine Programmer |
Prismatic Machining |
|
Plant Layout Designer |
Plant Layout Design |
|
Factory Simulation Engineer |
Plant Layout Design |
|
Robot Programmer |
Robot Programming Essentials |
For further assistance, please contact the SWYFT Support team at support@swyftsol.com and we’ll be happy to assist.