SOLIDWORKS Design is a professional 3D CAD solution used for creating parts, assemblies, and drawings across engineering and manufacturing workflows. A Network License allows multiple users to share a pool of licenses managed by a SolidNetWork License Manager (SNL) installed on a server. Users check out a license when SOLIDWORKS is launched and return it when they close the application.
In this article, you’ll learn how to install the SolidNetWork License Manager and SOLIDWORKS Design on a client computer using a Network License. We’ll walk through preparing your system, connecting to the license server, and completing the installation.
Once finished, you’ll be able to launch SOLIDWORKS and automatically obtain a license from your organization’s SolidNetWork License Manager server, allowing you to work seamlessly using your shared license environment.
Before You Begin
SOLIDWORKS offers multiple license types, and the installation steps differ depending on which one you use.
To ensure you follow the correct process, first confirm your license type:
-
Standalone License – activated on a single device
-
Named User License– tied to a user account rather than one computer
- Network License – managed through a SolidNetWork License Manager on a server and shared across multiple users
This guide reviews the installation steps if you have a Network License.
Prerequisites
Please verify the following information before you begin the installation:
- You have administrative privileges on the computer.
- You know the hostname or IP address of the license server.
- You have a valid SOLIDWORKS Design Network License serial number.
-
Your system meets the SOLIDWORKS System Requirements.
Installing and Activating the SolidNetWork License Manager Server
This section covers how to install and activate the SolidNetWork License Manager on the server that will host your SOLIDWORKS network licenses. The license manager is responsible for distributing licenses to users on your network and must be set up before any client machines can access SOLIDWORKS.
Obtain Installation Files
-
On the server/computer you will utilize as the host of the license manager, access the SOLIDWORKS Downloads portal.
-
Log in with your SOLIDWORKS ID, or create an account if you do not already have one.
-
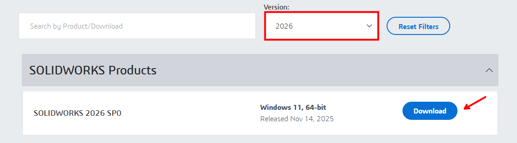
Select the version year you would like to install and select Download.
-
Scroll through the End User Agreement and select Accept and Continue.
NOTE: If you are presented with a message stating Subscription Confirmation Needed upon attempting to access the Downloads center, have your organization’s Security Administrator add you as a contact to your organization’s Site.
If you are unsure of who this is, contact your Value Added Reseller's (VAR) support team. If your licenses are supported by SWYFT Solutions, contact support@swyftsol.com.

Launch the SOLIDWORKS Installation Manager
-
Launch SolidWorksSetup.exe.
-
Select Unzip.
-
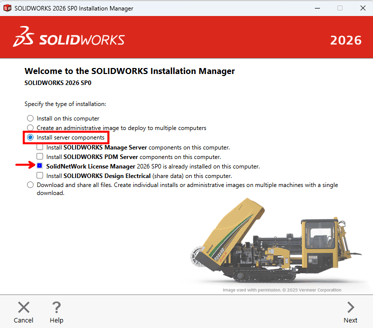
Select Install server components and then toggle the checkbox for SolidNetWork License Manager.
-
Select Next.
Enter Serial Number
-
Enter the serial number(s).
-
Select Next.
Complete Installation
-
Toggle the checkbox for I accept the terms of the SOLIDWORKS License Agreement.
-
Select Download and Install.
Activate License
- Launch the SolidNetWork License Manager Server application from Windows Search.
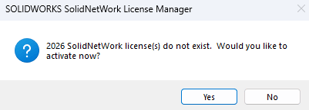
- When prompted with a message stating SolidNetWork license(s) do not exist..., select Yes.
- Leave the defaults for Computer Name, Port Number (25734) and Vendor Daemon Port Number (25735), and select Next.
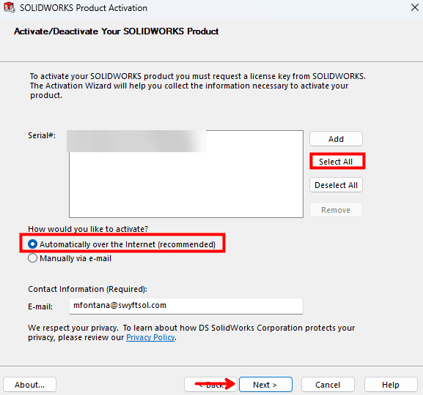
- Select Select All.
- Toggle the radio button for Automatically over the Internet (recommended).
- Enter your email address.
- Select Next.
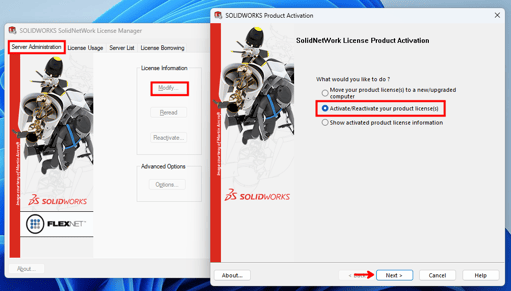
NOTE: If you are not prompted to activate the licenses automatically, you can select Modify on the Server Administration tab. Then, highlight the radio button for Activate/Reactivate your product license(s) and select Next.
Installing SOLIDWORKS Design on the Client Machine
This section explains how to install SOLIDWORKS on individual user computers and connect them to the SolidNetWork License Manager. Once configured, each client workstation will be able to request and use a license from the network license pool.
Obtain Installation Files
-
On each computer you would like to run SOLIDWORKS on, access the SOLIDWORKS Downloads portal.
-
Log in with your SOLIDWORKS ID, or create an account if you do not already have one.
-
Select the version year you would like to install and select Download.
-
Scroll through the End User Agreement and select Accept and Continue.
NOTE: If you are presented with a message stating Subscription Confirmation Needed upon attempting to access the Downloads center, have your organization’s Security Administrator add you as a contact to your organization’s Site.
If you are unsure of who this is, contact your Value Added Reseller's (VAR) support team. If your licenses are supported by SWYFT Solutions, contact support@swyftsol.com.
CAUTION: Always ensure you are installing the same major version (e.g., 2024, 2025) or older as your SNL server. Installing a newer major version than the SolidNetWork License Manager Server may cause license errors.
Launch the SOLIDWORKS Installation Manager
-
Run the SolidWorksSetup.exe file downloaded in the previous step and select Unzip.
-
If prompted, allow the installer to make changes to your system.
The SOLIDWORKS Installation Manager should now open automatically.
Select Installation Type
-
On the Installation Manager welcome screen, choose Install on this computer.
-
Click Next.

Enter the Network Serial Number
-
On the Serial Number page, enter the serial number provided for your SOLIDWORKS Network License for each of the products you would like installed that are available on that Network License.
- A Network serial number can provide access to multiple different products, so unless specified otherwise, the same serial number will be used for each product you plan to install.
-
Click Next.

Review Summary and Complete the Installation
-
The installer will scan your serial number and display available SOLIDWORKS products. Select Change next to any respective section of the summary if you would like to make any modifications.
-
Toggle the checkbox stating I accept the terms of SOLIDWORKS and select Download and Install.

Define License Server Port and Server Information
-
When prompted, enter the license server details in the following format: 25734@ServerName
-
25734 is the default port used by SOLIDWORKS.
-
ServerName is the hostname of your license server.
- If unknown, access System Information on the server/computer with the license manager installed, and it will be listed as the System Name in the System Summary section
-

-
-
-
If using an IP address, enter it as: 25734@<SERVER IP ADDRESS>.
-
-
-
Click OK.

NOTE: If your organization uses multiple license servers, separate them with semicolons (e.g., 25734@Server1;25734@Server2).
The installation manager should then proceed to download any necessary files and install SOLIDWORKS. Once the installation is complete, you should be able to launch SOLIDWORKS, as long as you are connected to the same network that the server/computer with the license manager installed is connected to. If you are not connected to the same network, you will need to establish a VPN connection to be able to successfully utilize one of the licenses from the Network pool.
Getting Support
If SWYFT Solutions is your Value-Added Reseller (VAR), our support team is happy to help you get up and running. You can email us at support@swyftsol.com, or call us at 616-631-3044.
If your licenses are supported by a different partner, don’t worry, their support team will be the best point of contact for assistance specific to your account!