Sheet formats define the layout, title blocks, borders, and annotations used in 2D drawings. Saving them to the 3DEXPERIENCE platform ensures they are accessible to all users across your organization for standardized documentation.
This article outlines the steps to save custom sheet formats to 3DEXPERIENCE and synchronize them with SOLIDWORKS.
NOTE: This article walks through the process specifically for SOLIDWORKS Sheet Formats. Once you have carried out this process, the locally synced sheet formats can be referenced in a SOLIDWORKS Drawing template. For more information on how to manage your SOLIDWORKS Drawing templates on 3DEXPERIENCE, you can use this guide: How to Manage Your SOLIDWORKS Templates on the 3DEXPERIENCE Platform
1. Save the Sheet Format Locally from SOLIDWORKS
-
Open SOLIDWORKS.
-
Open the drawing you want to use as a basis for your sheet format.
-
Go to File > Save As.
-
In the "Save as type" dropdown, select Sheet Format (*.slddrt).
-
Choose a temporary local folder and save the file.
NOTE: This local save is only a temporary step before uploading to the 3DEXPERIENCE platform.
2. Upload the Sheet Format to 3DEXPERIENCE
-
Log into the 3DEXPERIENCE platform.
-
Launch the Bookmark Editor app.
-
Navigate to or create a bookmark folder where your sheet formats will be stored.
-
Upload the Sheet Format file saved previously by selecting the Upload icon or drag and drop the file into the selected bookmark folder.

3. Sync Sheet Formats Locally from 3DEXPERIENCE to Use in SOLIDWORKS
-
Return to SOLIDWORKS.
-
Go to Tools > Options.
-
In the System Options dialog, select File Locations from the left-hand menu.
-
In the dropdown at the top, select Sheet Formats.
-
Click Add.
-
In the Add dialog, choose Open from 3DEXPERIENCE.

-
Navigate to the bookmark folder where your sheet formats were uploaded.
-
Confirm the selection and click OK.
-
Confirm all remaining dialog boxes.
These sheet formats are now synchronized locally on your computer. If there are any updates made to those sheet formats on 3DEXPERIENCE in the future, the updated copy will automatically sync to your local computer the next time you connect to the 3DEXPERIENCE platform with SOLIDWORKS.
TIP: If you need to reference one of these sheet formats in a drawing template, you can carry out the following steps to locate the exact path the files are stored at. Since these are synced to a public user path, as long as you, or anyone else on your team, have also added this file location in the System Options, then the drawing template will not lose its reference to the local Sheet Format.
-
In SOLIDWORKS, go to Tools > Options.
-
In the System Options dialog, select File Locations from the left-hand menu.
-
In the dropdown at the top, select Sheet Formats.
- Highlight the Bookmark previously synced.
-
Click Update.

Generally, this will be in C:\Users\Public\Documents\SOLIDWORKS\<TENANT ID>\<BOOKMARK ID>
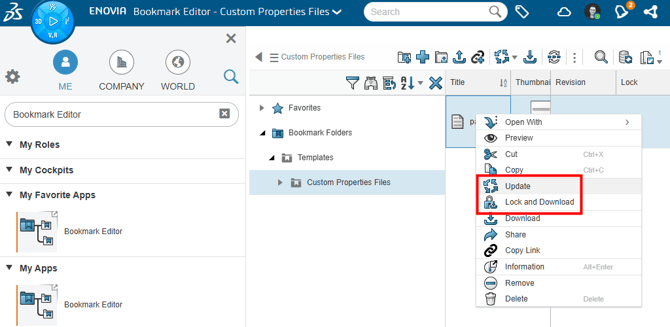
4. Updating an Existing Sheet Format
To modify a sheet format already stored in 3DEXPERIENCE, follow this complete update process:
-
Log into the 3DEXPERIENCE platform and open the Bookmark Editor app.
-
Navigate to the bookmark where the sheet format file is stored.
-
Right-click the file and select Lock and Download.
-
After the file downloads, open the file in SOLIDWORKS, make your changes, and save the file locally.
-
Return to the Bookmark Editor, right-click the same file, and select Update.
-
Browse to your updated local copy and upload it to replace the existing one.
The next time SOLIDWORKS launches and connects to the platform, the updated format will be automatically synchronized and made available.
For further assistance, please contact the SWYFT Support team at support@swyftsol.com and we’ll be happy to assist.