SOLIDWORKS may crash or close unexpectedly for a variety of reasons, including incompatible graphics drivers, corrupted user settings, unstable add-ins, hardware issues, or corrupted files. While crashes may seem unpredictable, most can be diagnosed and resolved by following a structured troubleshooting approach.
This guide walks you through the most common causes of SOLIDWORKS instability and provides clear steps to help you identify and fix the issue. Once complete, SOLIDWORKS should run more reliably and with fewer interruptions.
Common Causes of SOLIDWORKS Crashing
Below are the most frequent root causes, followed by detailed troubleshooting steps.
-
Unsupported or outdated graphics drivers
-
Corrupt or conflicting SOLIDWORKS user settings
-
Problematic add-ins
-
File-specific corruption
-
Insufficient or unstable system hardware
-
Third-party applications interfering
-
Corrupted SOLIDWORKS installation components
Troubleshooting Steps
1. Launch SOLIDWORKS in Software OpenGL Mode
Using Software OpenGL Mode forces SOLIDWORKS to bypass your system’s graphics card and instead use a simplified, CPU-based rendering method. This is one of the fastest ways to determine whether crashes or instability are caused by GPU drivers, unsupported graphics hardware, or hardware acceleration issues.
If SOLIDWORKS becomes stable when running in Software OpenGL Mode, the crash is almost always related to graphics hardware or drivers.
-
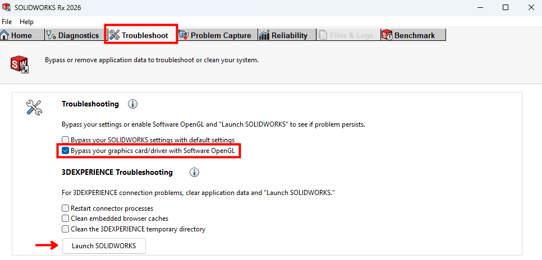
Open the Start Menu and search SOLIDWORKS Rx.
-
In the Troubleshoot tab, toggle the checkbox for Bypass your graphics card/driver with Software OpenGL
- Select Launch SOLIDWORKS.
-
Repeat the action that previously caused the crash to check if the issue persists.
NOTE: If using SOLIDWORKS Rx 2025 or older, you will instead select Click here to launch SOLIDWORKS in Software OpenGL mode in the SOLIDWORKS Safe Modes section on the Home tab.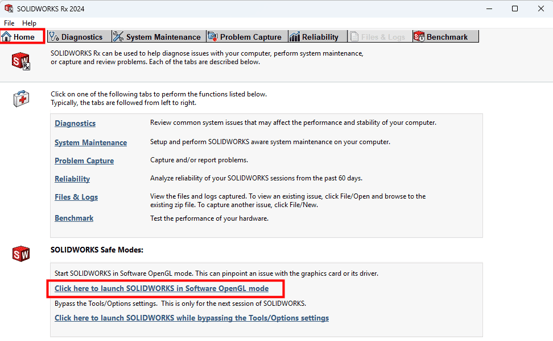
If SOLIDWORKS is stable in Software OpenGL Mode, proceed with:
-
Updating to a certified graphics driver
-
Confirming your GPU is supported by SOLIDWORKS
If SOLIDWORKS still crashes, continue to the next troubleshooting steps.
2. Launch SOLIDWORKS While Bypassing Tools/Options Settings
SOLIDWORKS stores a wide range of user-specific settings, such as display modes, performance options, file locations, and system preferences. Over time, these settings can become corrupted, especially after upgrades, system migrations, or unexpected shutdowns.
Bypassing these settings allows SOLIDWORKS to launch with default internal settings, helping you determine whether the crash is caused by corrupted or problematic configuration data.
If SOLIDWORKS runs normally in this mode, user settings are the most likely cause of the instability and a registry reset should resolve the issue.
-
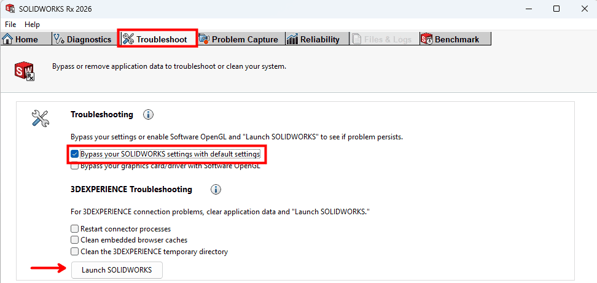
Open the Start Menu and search for SOLIDWORKS Rx.
-
In the Troubleshooting tab, toggle the checkbox for Bypass your SOLIDWORKS settings with default settings.
- Select Launch SOLIDWORKS.
-
Perform the same action that previously caused the crash to see if the issue is resolved.
NOTE: If using SOLIDWORKS Rx 2025 or older, you will instead select Click here to launch SOLIDWORKS while bypassing the Tools/Options settings in the SOLIDWORKS Safe Modes section on the Home tab.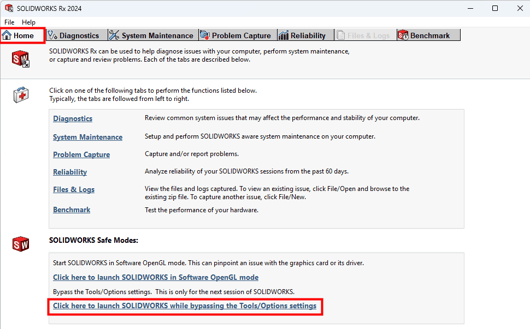
If bypassing the settings fixes the crashing behavior, you should:
-
Reset SOLIDWORKS settings to defaults using SOLIDWORKS Settings Wizard or back up and delete the registry keys at HKEY_CURRENT_USER\Software\SolidWorks
If bypassing settings does not help, proceed to the next troubleshooting section.
3. Repair Your SOLIDWORKS Installation
If SOLIDWORKS continues to crash after testing Software OpenGL Mode and bypassing user settings, the installation itself may be damaged or incomplete. This can occur after Windows updates, interrupted installs, hardware failures, or conflicts with other applications.
Repairing your SOLIDWORKS installation replaces missing or corrupted program files without removing your license or uninstalling the software.
-
Close SOLIDWORKS and all related applications.
-
Open Control Panel > Programs and Features.
-
Locate SOLIDWORKS in the list of installed programs.
-
Select it and click Change.
-
In the SOLIDWORKS Installation Manager, choose Repair Your Installation.
-
Follow the prompts to complete the repair process.
-
Restart your computer when the repair is finished.
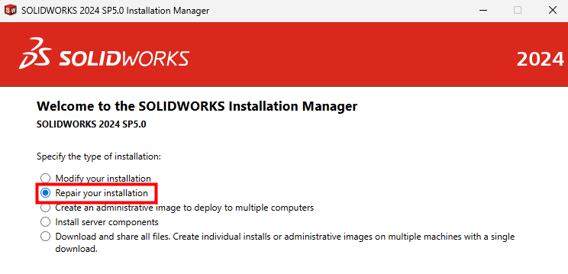
NOTE: If you have a Named User license of SOLIDWORKS, the repair functionality is not available at this time, and you will need to proceed to the next steps.
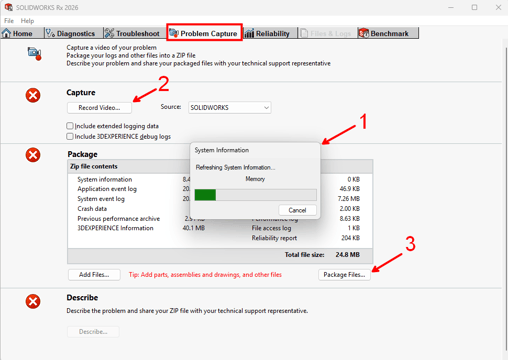
4. Collect a SOLIDWORKS Rx Package to Send to Your VAR
-
Close SOLIDWORKS completely.
-
Open the Start Menu and search for SOLIDWORKS Rx.
-
Go to the Problem Capture tab.
-
Allow the tool to finish gathering logs and details.
-
Under Capture, choose whether to record a video of the issue:
-
Record Video (recommended if the crash is repeatable)
- It is recommended to have the Source set to SOLIDWORKS.
-
Skip Video (if issue cannot be replicated)
-
-
Follow the steps to reproduce the crash if recording video.
-
After collection, SOLIDWORKS Rx will package everything into a .zip file.
-
Save the file to a convenient location and share with your Value Added Reseller's (VAR) support team for further analysis.
- If your licenses are supported by SWYFT Solutions, contact support@swyftsol.com and our team will provide an upload link to share the ZIP file collected with SOLIDWORKS Rx.
For further assistance, please contact the SWYFT Support team at support@swyftsol.com and we’ll be happy to assist.