Important note: Starting November 15th, 2025, SOLIDWORKS has updated its product names. This article applies to SOLIDWORKS Design Named User Licenses. If you were using 3DEXPERIENCE SOLIDWORKS (also known as SOLIDWORKS Connected), you can continue with these instructions, as the steps will be the same.
Renewing your SOLIDWORKS subscription is a great way to ensure you have continued access to updates, support, and cloud-based tools. However, simply renewing isn’t the end of the process. There are a few key steps you need to take to ensure a seamless experience.
Topics covered in this post:
Step 1: Ungrant Expired Roles:
If your SOLIDWORKS renewal included changes to your roles, such as upgrading to a different package or switching assigned users, you need to manage role assignments and remove any expired ones in your 3DEXPERIENCE platform.
-
Log into your 3DEXPERIENCE platform and navigate to the Members Control Center app

-
Identify Expired Roles: Click on the “i” next to a user’s name to explore their roles.

-
Select the user associated with a changed role (such as switching from SOLIDWORKS Design Premium to Standard
-
-
Select View All and look for any roles that have expired.
-
De-select the checkmark associated with any expired role to be removed.
-
TIP: Be sure to check the ‘View All’ option to see if any expired roles are hiding in here!

(For more detailed instructions on performing this step, please see this blog on ungranting expired roles.)
Why This Is Important:
Failing to ungrant expired roles can lead to access issues.
Step 2: Assign New Roles:
-
While in the members information card, click View All and locate the new or updated roles included in your renewal.
-
Click the check-box to assign new roles to the appropriate users based on your organization’s needs.
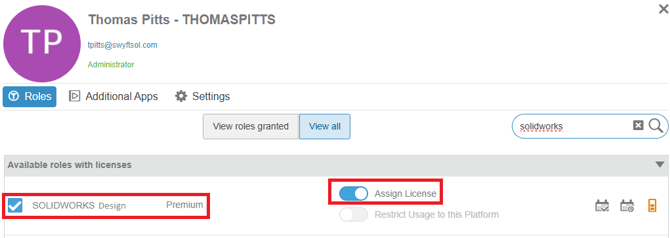
-
Confirm the changes and ensure users have the correct permissions.
(For more detailed instructions for performing this step, please see this blog on updating your 3DEXPERIENCE Roles.)
Why This Is Important:
Assigning the correct roles ensures your team has the proper tools and capabilities aligned with your renewal package.
Step 3: Update SOLIDWORKS Design:
If your renewal included a change in product tier (i.e. moving from SOLIDWORKS Premium to Standard), you need to update your SOLIDWORKS Design Installation to reflect the correct license. If you are receiving an error similar to “License not granted: XWC - SOLIDWORKS Design Premium is missing or expired...” then these steps should remedy the situation.
-
Navigate to your Platform and click on the Compass
-
Find SOLIDWORKS Design and click on the little down arrow at the bottom right of the icon.
-
The software will check your local installation against your roles, and a status bar will pop up. If there is a little circle of arrows, this indicates an update is needed. Click on this to begin the update process.

NOTE: If there is also a HotFix installation pending, you may have to carry out this step multiple times. Repeat until there is no update icon available on the fly out.
-
Once the update is complete, your SOLIDWORKS Design software should be ready to use!
(For more detailed instructions for performing this step, please see this blog on updating your SOLIDWORKS Design installation.)
Why This Is Important:
Using a mis-matched installation of SOLIDWORKS design as compared to your active role tier will prevent the software from launching successfully. Ensuring the correct software tier is installed ensures access to your new subscription features.
Final Checks and Best Practices
-
Verify User Access: After a renewal, remove expired roles, assign new roles, and have your team members log in and confirm they have the expected access and roles.
-
Check for Software Updates: Ensure your SOLIDWORKS installation is at the proper tier to avoid interruption to your SOLIDWORKS software.
-
For further assistance, please contact the SWYFT Support team at support@swyftsol.com.